Simple Menu #
In this tutorial you’ll learn how to make a simple menu that utilizes the more common functionality of JAMS as seen below. You will need some basic knowledge of Godot such as creating scenes, configuring nodes in the inspector, and connecting signals in the inspector.
Create the scene tree #
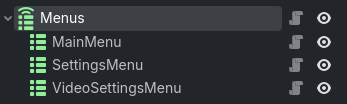
Create a new scene and select Other Node, search for a MenuRouter node, select it, and rename it to “Menus”. Then, add three MenuContainer nodes to your scene and name them “MainMenu”, “SettingsMenu”, and “VideoSettingsMenu”. Your scene tree should now look something like this:
If you don’t see the JAMS nodes mentioned above, make sure the
just-another-menu-systemplugin is installed and enabled
Save your scene. Now lets add some buttons to your menus!
Add menu content #
First, make sure all of your menu nodes are set to the Full Rect anchor preset. This isn’t a requirement but is what we want for this example. Next, add a VBoxContainer node to each of your MenuContainers and set each VBoxContainer’s anchor preset to Center. These will hold the menu content.
MainMenu #
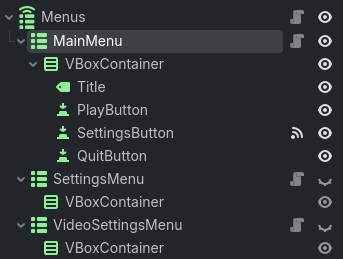
For the main menu we’re going to add a Label for the title and three Buttons. Set the label text to “My Cool Game” and rename the node to “Title”. Then add text for each button, “Play”, “Settings”, and “Quit”, and rename the buttons “PlayButton”, “SettingsButton”, and “QuitButton” respectively. Your scene tree should now look like this:
SettingsMenu #
When working on a menu, toggle the visibility of the other MenuContainer nodes so it’s easier to see what you’re doing
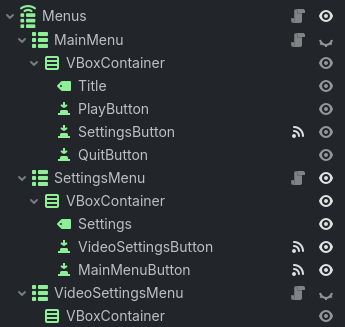
For the settings menu we’re going to add a Label to represent where the settings would be and two Buttons. Set the label text to “My Settings” and rename the node to “Settings”. Then add text for each button, “Video Settings” and “Main Menu”, and rename the buttons “VideoSettingsButton” and “MainMenuButton” respectively. Your scene tree should now look like this:
VideoSettingsMenu #
In practice, it may be better to have the different settings menus exist as tabs in a single scene, but for this example the video settings will be a separate scene
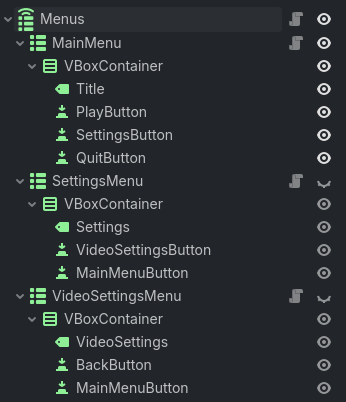
For the video settings menu we’re going to add a Label and two Buttons. Set the label text to “My Video Settings” and rename the node to “VideoSettings”. Then add text for each button, “Back” and “Main Menu”, and rename the buttons “BackButton” and “MainMenuButton” respectively. Your scene tree should now look like this:
Connect the signals #
Now that we have our menus set up, we need to connect the buttons to the MenuRouter node so we can navigate with them.
MainMenu #
Select the SettingsButton node and double click the pressed() signal in the inspector to open the signal connection dialog. Make sure the Advanced toggle is enabled so you can add extra arguments to the function.
Select the MenuRouter node, Menus, in the tree on the left side of the dialog, then click Pick. In the newly opened dialog you should see a list of methods on the MenuRouter node you can connect to. Make sure Compatible Methods Only is disabled so you can see all of the methods on the node and select open_menu(...).
On the right side of the dialog you should see the Add Extra Call Argument section. From the dropdown, select the type String and click Add. You should see a newly added string argument in the Extra Call Arguments section below with an empty text box, that argument is the name of the menu you want to open. Set it to “SettingsMenu”. Your signal dialog should now look like this:
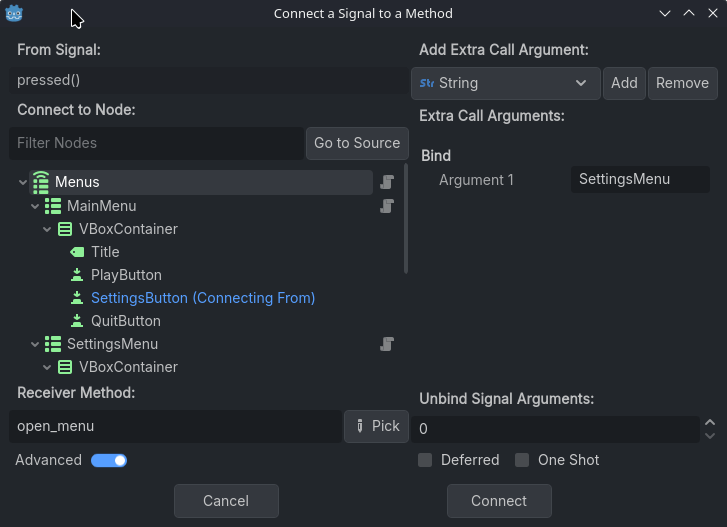
If your dialog matches the above, hit the Connect button to connect your button to the router. That’s it! The SettingsButton should now open up the SettingsMenu when pressed.
We’ll be using the advanced signal dialog to connect all of the related signals for JAMS
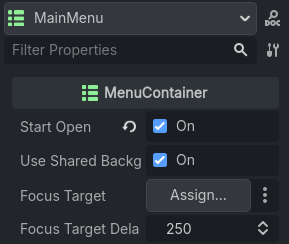
Before we move on, select your MainMenu node and enable Start Open in the inspector. This tells the MenuRouter to open this menu automatically when it loads. You’ll want to set this for any menu you want to start open on its own, without being called by a separate action, otherwise your menu won’t open.
SettingsMenu #
Select the VideoSettingsButton in the tree and connect the pressed() signal to the open_menu(...) function just like you did above, but make the menu name argument “VideoSettingsMenu”.
For the “MainMenuButton” we’ll use the go_back() method to navigate one step backwards in the stack, or in this case back to the MainMenu. Connect the “MainMenuButton” to the go_back() method but don’t pass any arguments to it. The method can accept a boolean to determine if the previous menu should be opened or not, but in this case, and most cases, we do want it opened.
Your settings menu should now open the VideoSettingsMenu when clicking the VideoSettingsButton and go one step back to the MainMenu when clicking the MainMenuButton.
VideoSettingsMenu #
Select the Back button in the tree and connect it to the go_back() method so it takes us one step back to the SettingsMenu.
For the MainMenuButton we’ll use the go_to() method. The go_to() method opens the menu matching the passed key, but also clears the previous menu stack. This is ideal for situations like this where we want to go back to the start of our menu stack. Connect the MainMenuButton to the go_to() method and add “MainMenu” as an extra string argument.
Your VideoSettingsMenu should now go back to the SettingsMenu when clicking the BackButton and go back to the MainMenu when clicking the MainMenu button.
Finishing touches #
At this point you should have a functioning menu stack, congrats! Before we move on to the advanced demo, lets go over some other neat features of JAMS, specifically auto focusing a node on open for gamepad support and shared menu backgrounds.
Auto focus on open #
You should be able to navigate through all three menus as you’d expect, but right now it only supports mouse input which isn’t ideal for both accessibility reasons and if you want to add gamepad support. Thankfully that’s easy to handle in JAMS!
Select the MainMenu node in the tree, you should see a Focus Target field in the inspector that accepts a Control node. Either drag and drop the “PlayButton” into the field, or select it by clicking Assign. For this example we’re using the PlayButton as its the first button in the UI, but you could use any focusable control node that fits your needs.
The next field, Focus Target Delay, sets the delay in milliseconds before the node is focused. This helps mitigate issues where the player accidentally selects an option the moment the menu opens. Increase it if you need, or set it to 0 to disable the delay entirely. Your MainMenu node should now look something like this:
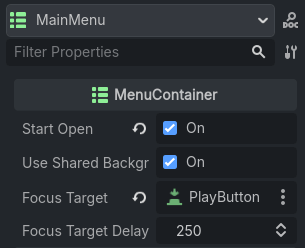
Now set the focus target for the SettingsMenu and VideoSettingsMenu and try running your scene. You should see your assigned button focus after the delay, allowing you to navigate the menu with just keyboard or gamepad input! Try navigating through all three menus to confirm the focus target is working as expected.
Shared Background #
Since JAMS is simply toggling the visibility of the MenuContainer node when opening and closing menus, you can add a background and other menu related art as a child of a MenuContainer and it will open with your menu as expected. But if you have a lot of menus all using the same background, you can use a shared background instead!
Add a ColorRect node as a child of your MenuRouter node, Menus, and name it “Background”. Set the anchor preset to Full Rect, under Ordering set the Z Index to -10, and under Mouse set Filter to Ignore. Then set the Color to whatever color you want, I’m using #05000770 for a nearly black, slightly transparent background.
Select your MenuRouter node and assign your new Background node to the Background field in the inspector, either by dragging and dropping or using the dialog when clicking Assign. Your shared background should now open and close with your menus! The shared background will only close when all menus are closed.
You may have noticed that the MenuContainer node has a Use Shared Background boolean field that is true by default. If you have a menu that should use a different background than the shared one, just disable this field.
Conclusion #
You’ve learned how to make a simple menu stack with keyboard support and a shared background with no extra code! Your menu should look something like this now: